Showing posts with label Stampendous. Show all posts

Friday, July 11, 2014

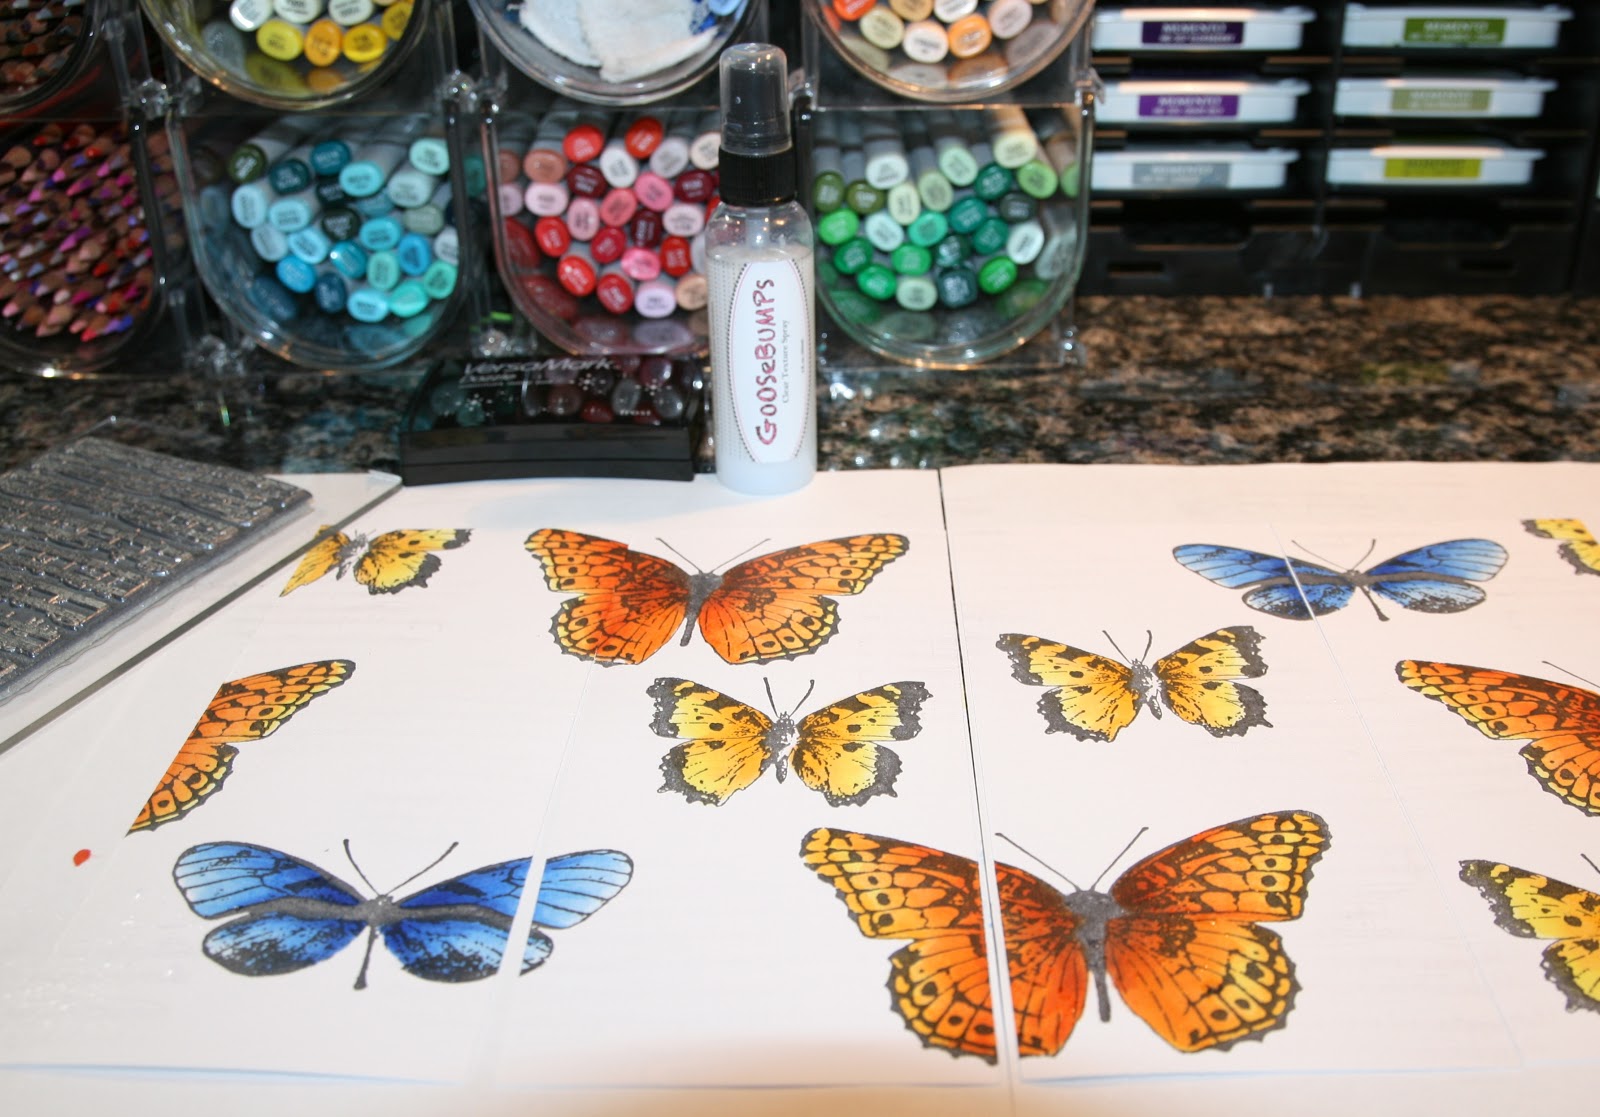
Watercolor Butterflies


I've been cleaning out my craft room and came across another old favorite. This butterfly is from the Stampendous Cling Jumbo Hydrangea set. Remember that one? Another great set but alas, it is no longer available.

Using Canson 140 lb Watercolor paper and Dr. Ph. Martin's Hydrus Fine Art Watercolors, I created a sort of tie-dyed panel. Quick tip: when making tie-dyed panels, fill a shallow rectangular pan with water (I used a disposable aluminum casserole tin that you get at the grocery) and submerge your panel for just a minute or so. This makes it so quick and easy to wick paint through the paper and blend with the other colors.

Dr. Martin's is my favorite brand of watercolor paint. It's a concentrated liquid that comes in a bottle with an eye dropper top. A drop is all you need to create vibrant color on your page. Because of the dropper top, it is also easy to create drips and splatters. I linked to Donna Downey's store where she sells them in kits and as single bottles. While you are there, check out some of the other unique and amazing stuff she has. BTW: Her customer service is amazing! And no, I don't get anything for sending you there. It's just my way of saying, "Thanks, Donna." She has given us all so much with her classes, videos and free tutorials.

After my panel was dry, I stamped the butterflies, using Ranger Archival Jet Black ink, fussy cut them and adhered them to the card. The sentiment is from another retired Stampendous set.

Thanks for visiting.

Thursday, July 10, 2014

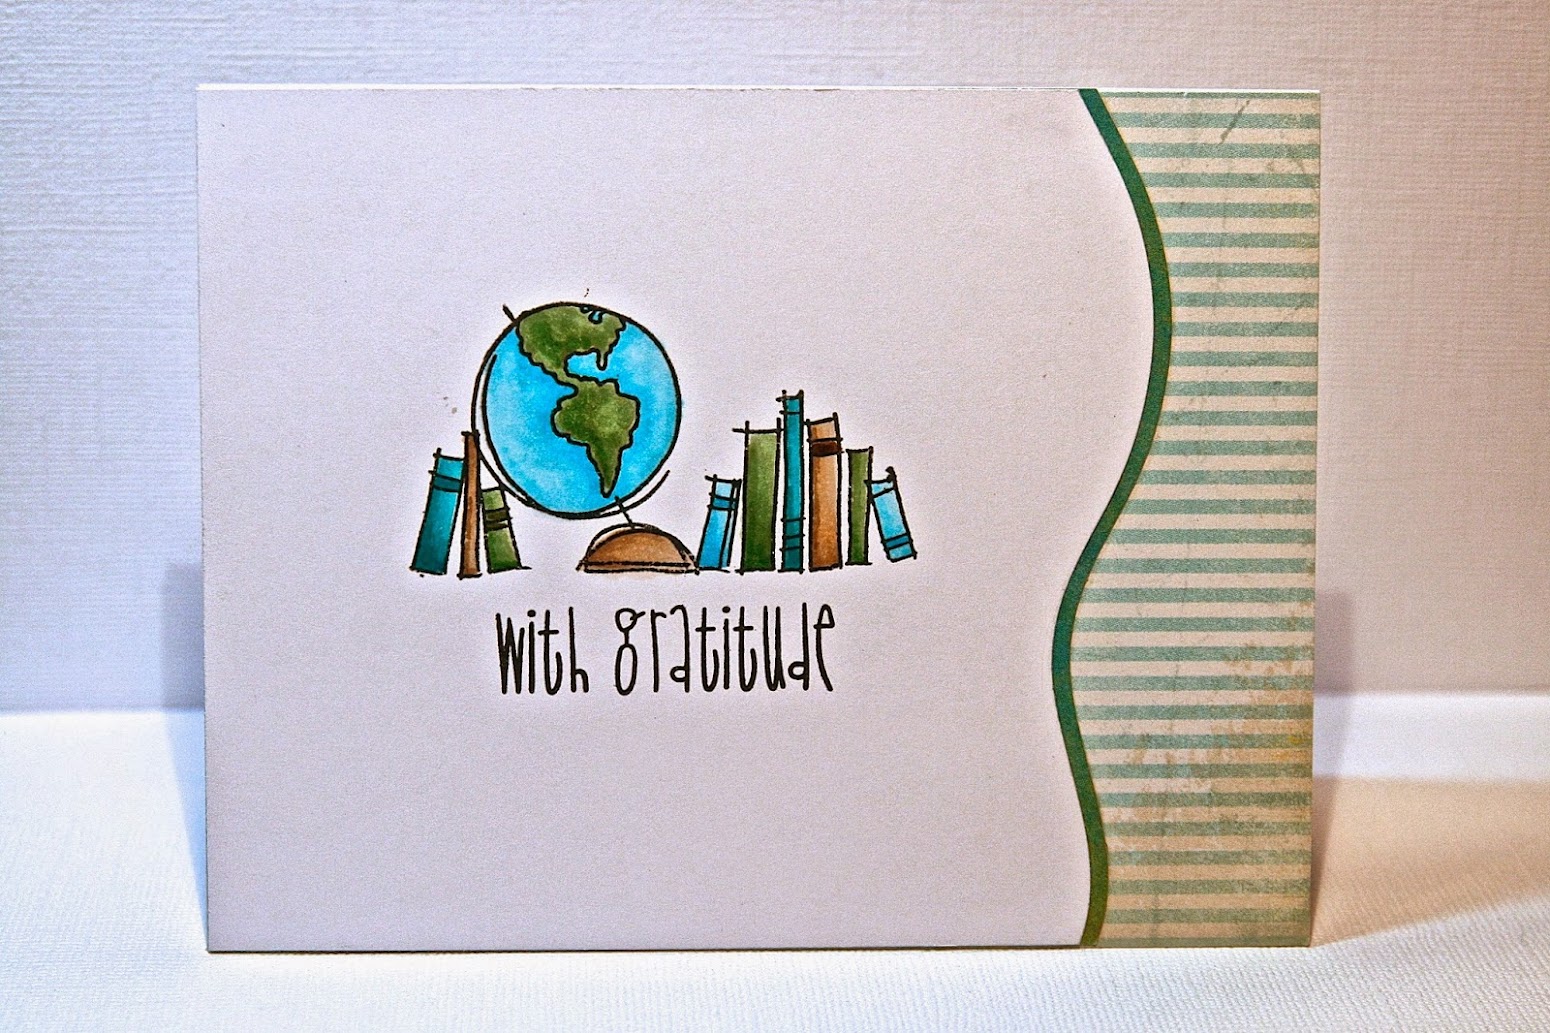
Teacher Appreciation Cards: With Gratitude


Another teacher thank you card. This one was given to my son's Social Studies teacher.

The image is from Stampendous but it is so old, I can't even tell you the name. It's still a favorite. The sentiment is Many Thanks from Paper Smooches and can be found at Ellen Hutson, LLC. Copic Markers were used.

Thanks for visiting.

Teacher Appreciation Cards: I Love Paris


A thank you card for my son's french teacher:

I stamped the Script, Impression Obsession Cover-a-Card stamp with Ranger Adirondack Acrylic Paint Dabber in Pearl on 2 pieces of Neenah card stock. After the paper was dry, I swiped Ranger Mowed Lawn and Peacock Feathers Distress ink pads onto my craft mat, spritzed with water and then ran the stamped paper through it. Once again, I set the paper aside to dry. I stamped the Stampendous, I Love Paris image with Ranger Archival Jet Black ink, colored the flowers with Prismacolor colored pencils and added highlights with a white Uni-ball Impact Gel Pen. All supplies can be found at Ellen Hutson, LLC except for the I Love Paris image which is retired.

Thanks for visiting.


Friday, April 12, 2013

Something New


I love Donna Downey and her art. But who doesn't? Right? I've never met her but I can just tell she's the kind of person who gives freely of her knowledge. Her passion and enthusiasm for art are so contagious. When watching her videos, she makes you feel like you too could pick up a brush and create something wonderful.

Recently, I discovered that she offers a monthly online canvas class and decided to sign up. While waiting for some supplies to arrive, I practiced what I learned from the class video on these tiny 3-1/2" x 2-1/2" canvases.

I started by covering the canvases with a base coat of acrylic paint. It was then time to add texture. Donna recommended using very common scrapbooking supplies but when I grabbed mine, I discovered they were so old they couldn't be used. Nope, I'm not going to tell you the supply. Spend the $25. You'll be so glad you did. Sitting on my workspace was a bunch of Stampendous Essentials (Color Fragments, Mica and Crushed Glass Glitter). Essentials add delicious texture to projects and are available in a wide range of amazing colors. For this project, the color wasn't important as I just wanted the texture so I grabbed what was sitting there and embedded them into the paint. It was simple. I just brushed on Gel Matte Medium where I wanted the texture and while wet, sprinkled on the Essentials. It's important to let this dry completely. I then added more paint, covering the embedded fragments and glitter. Next, I grabbed a Martha Stewart Home Decor stencil (you can find these at Michaels but any stencil will do) and my Faber-Castell Pitt Artist Pens. I used the white Pitt Pen to get the basic design onto each canvas and added color after the white had dried.


Here are some closeups of the texture created by the Stampendous Essentials. I love the look and texture so much, I am going to give it a try on something bigger. Donna Downey has her own line of stencils. I'm thinking creating something with her Hollyhocks stencil would make me very happy so stay tuned.


I can't get over how creating these three little canvases made me feel. I encourage you to visit Donna's Blog and try an online class or two. The joy you feel is cleansing. Now onto the real class assignment.

Thanks for visiting. I am so thankful for your comments.

Monday, April 8, 2013

Butterfly Lamp

Something new today (at least to me)...the Paper Fusion Creative Lamp kit. While at Dick Blick's, I came across these kits and had to try making one. These kits scream Stampendous Jumbo Cling stamps. I decided to use the Butterfly Trio.


I stamped the butterflies on the included panels, using Tsukineko Memento Tuxedo Black ink.


After coloring the butterflies with my Copic Markers, I stamped the Stampendous Music Score background in the whitespace. I used Tsukineko VersaMark Dazzle in Frost to give it a little sparkle and then spritzed the panels with Tsukineko Goosebumps.


I then inked the panels with Memento Summer Sky to bring out the Music Score image and the Goosebumps. I also stamped a flourish from the Stampendous Daisy Thanks set, also with the Summer Sky ink.


The lamp was easy to assemble. If I were to make another one, I would sand the frame and give it a gloss coat before putting it altogether but this was a fun project. Because these kits come in different sizes, I see a cluster of them on a side table, maybe with a different Stampendous Jumbo flower on each one.


Thanks for visiting!

Sunday, February 17, 2013

Ruff Day?


My dad has been feeling a little under the weather lately so I thought I'd send a card to let him know I'm thinking of him. This new Stampendous Cling Doctor Kiddo is perfect. I stamped the image onto Copic X-Press It Blending Card and colored it with my Copic markers. I created the sentiment on my computer. The background panels were made using My Mind's Eye Blink of an Eye patterned paper. A button, jute and some tulle and my card is done. You can check out all of the new Stampendous products here.


Thanks for visiting and for your kind comments!

Wednesday, January 30, 2013

Another New Stampendous Floral


Today, I'm sharing a card featuring this brand new Stampendous floral image, Seed Catalog. Here's a quick supply list and directions:

Stampendous CRR161 Seed Catalog
Bazzill Cardstock
Copic X-Press It Blending Card
Tsukineko Memento Tuxedo Black Ink
Copic Markers
May Arts Ribbon

Create card base and panel.
Stamp Seed Catalog onto X-Press It Blending Card using Tuxedo Black ink; Color with Copics.
Adhere to panel and card base; Twist and attach ribbon.

Thanks for visiting!


Monday, January 28, 2013

Another Stampendous Challenge Card, Another New Kiddo


I just love catalog release time! The new Stampendous products are fantastic! Here is a little itty bitty card that uses the new Kiddo Birthday stamp set. This set has both a cute boy and girl kiddo and lots of little extras like the banner, table, cake and presents I used in my card. Stampendous also just released micro glitter in the most delicious colors. I coated brads in Glossy Accents and dipped them in the new Lime Micro Glitter. Look for these cool new Stampendous products in a store near you. They should be showing up any day now. Here are the details:

Noteworthy Supplies and Directions:
Stampendous SSC1164 Kiddo Birthday
Stampendous MG08 Lime Micro Glitter
Little Yellow Bicycle Patterned Paper
Bazzill Cardstock
Copic X-Press It Blending Card
Tsukineko Memento Tuxedo Black Ink
Copic Markers
Spellbinders Lacy Squares Dies
Ranger Glossy Accents
Brads

Stamp boy and banner on X-Press It Blending Card; Color with Copics; Fussy-cut.
Stamp table with cake and presents on patterned paper panel; Color with Copics.
Create card base by die cutting two Lacy Squares; Adhere together.
Coat two brads with Glossy Accents; Dip in Lime Micro Glitter; Seal with more Glossy Accents.
Create mat for patterned paper panel; Adhere to panel; Punch holes and add glittered brads.
Attach colored images.
Adhere everything to card base.

There are a few more days to play in the Stampendous Kiddos Challenge. I'm going to be adding this one. Check out all of the details here.

Thanks for visiting!

Wednesday, January 23, 2013

More New Stampendous...This One's for My Mum


No one does flowers like Stampendous! I first fell in love with this company because of their beautiful flower stamps. They offer something for everyone with their Cling Jumbos and their Perfectly Clear Flower images, all of which are fun to stamp, color and/or emboss. New Stampendous florals will be arriving in stores in the next few weeks and I promise, you are going to love them.

Today's card uses the new Cling Sweet Pea stamp. You'll be seeing me use this one a lot. I love sweet peas. My grandma grew sweet peas from seeds that she collected from her relatives. My mum was smart and saved some of these very seeds and grows beautiful sweet peas every year. I don't know who loves them more - my mum or me? I do know sweet peas make me happy. This one's for you, Mum xoxo.

Noteworthy Supplies and Directions:

Stampendous CRP189 Cling Sweet Pea
Bazzill Cardstock
Copic X-Press It Blending Card
Tsukineko Memento Tuxedo Black Ink
Copic Markers
May Arts Ribbon
May Arts Twine
Button

Create card base and panels.
Stamp Sweet Pea onto X-Press It Blending Card; Color with Copics.
Wrap ribbon around larger panels; Adhere to card base.
Add tulle; Adhere remaining panels.
Finish by threading button with twine; Attach to card base.

Thank you so much for visiting!


New Kiddos at Stampendous


There's still time to enter this month's Stampendous Challenge which is all about Kiddos. If you're new to Kiddos, it's an adorable line of stamps showcasing really cute kid images doing all kinds of fun activities (bike riding, fishing, skate boarding, dancing, celebrating birthdays...). Kiddos are so much fun to stamp and color.

Have I peeked your curiosity? Want to play along? Stamp your favorite Stampendous Kiddos on any type of project and link it to the linky tool below for your chance to win a Kiddo of your own! You can use other cute kid stamps you already own, but Stampendous Kiddos on your project make it count twice. Please note: to be eligible to win, you need a U.S. Mailing address. You can read all our official rules here on our Challenge Rules Page.

Today's card uses the new Stampendous Boots Kiddo. Yes, that's right, it's brand new. All this week, design team members are showcasing the newest and coolest, soon to be released products and this cutie is one of them.


Noteworthy Supplies and Directions:

Stampendous CRM292 Cling Boots Kiddo
Stampendous SSC1164 Kiddo Birthday
Stampendous CRR105 Dream Text
Bazzill Cardstock
Neenah Desert Storm Cardstock
Patterned Paper
Copic X-Press It Blending Card
Tsukineko Memento Tuxedo Black Ink
Tsukineko VersaMark WaterMark Ink
Clearsnap Colorbox Frost White Ink
Copic Markers
Twine

Create card base and corresponding panels from various colors of cardstock; Swipe panel edges with Frost White ink.
Create decorative edge on top panel by punching small holes with a paper piercer.
Stamp Dream Text onto top panel using VersaMark ink.
Adhere panels together; Wrap twine around panels; Adhere to card base.
Punch several circles varying in size from cardstock and patterned paper; Swipe edges with Frost White ink;
Cut slits in circles to create frills.
Stamp sentiment onto one circle using Tuxedo Black ink.
Layer circles; Adhere to card base.
Stamp Boots Kiddo onto X-Press It Blending Card using Tuxedo Black ink; Color with Copics.
Create decorative edge around image.
Adhere colored image panel to mat and then card base.

Are you having fun and want to see more? Please visit my fellow design team members' blogs. You can find links along my sidebar. Thanks for visiting!


Tuesday, January 22, 2013

Stampendous Sneak Peeks From All of Us


All this week, the Stampendous Design team is sharing projects using new CHA-showcased, Stampendous products. That's right, coming to a store near you, new stamps, color fragments, mica fragments and micro glitter. Look for the new products in the next few weeks.

My card uses the new On the Farm stamp set and new Hot Lime color fragments along with a sentiment from the Stampendous Birthday Assortment set and my favorite Sage and Leaf Green color fragments.


Noteworthy Supplies and Directions:

Stampendous SSC1162 On The Farm
Stampendous SSC1115 Birthday Assortment
Stampendous FRC20 Hot Lime Color Fragments
Stampendous FRC02 Sage Green Color Fragments
Stampendous FRC13 Leaf Green Color Fragments
Bazzill Cardstock
Neenah Desert Storm
Copic X-Press It Blending Card
Tsukineko Memento Tuxedo Black Ink
Copic Markers
May Arts Twine
Button

Create scene by stamping and masking various images from the On The Farm set onto X-Press It Blending Card using Tuxedo Black ink; Color with Copic Markers.
Adhere to green mat and card base.
Stamp sentiment from Birthday Assortment set onto white cardstock; Mat and adhere to card base.
Mix together small amounts of Hot Lime, Sage and Leaf Color Fragments.
Add liquid glue to random grassy areas; sprinkle with Color Fragments.
Thread button with twine; Adhere to card.

Please visit my teammates' blogs to see their amazing creations. You can find all of their links on the right side of my blog. Thanks for visiting!

Wednesday, January 9, 2013

Got Worms?


I had a few minutes today so I thought I'd play along with this month's Stampendous Challenge. The theme is Sweet Kiddos. For all of the challenge details, please check out the new Challenge Page on the Stampendous Impressions blog. It would be great if you played along too.


I used the Stampendous Fishing Kiddo stamp, colored with Copic Markers. After coloring, I added some more texture to the image by crunching some Stampendous Color Fragments and adhering them to the grassy areas. My sentiment was stamped with the Stampendous Small Typewriter Alphabet. Some patterned paper (We R Memory Keepers & Echo Park), a wooden bead for a bobber and netting from some fresh produce and the card is done.

Thanks for visiting!


Noteworthy Supplies:


Thursday, January 3, 2013

A New Year, A New Stampendous Challenge


It's a new year and a new month so that means a new Stampendous challenge. You're going to love this one. The theme is Sweet Kiddos. Stampendous has the most adorable collection of kid stamps, called kiddos. They are so much fun to color and are perfect for so many different occasions.

My card today features these very cute Kissin' Kiddos. Valentine's Day will be here before you know it. This stamp would be perfect for school valentine's parties.

Supplies:

Stampendous Kissin Kiddos
Stampendous Small Typewriter Alphabet
Stampendous Stardust Embossing Powder
Tsukineko Memento Tuxedo Black Ink
Copic Markers
Copic X-Press It Blending Card
American Crafts Love, Can’t Help Falling patterned paper
Canvas Corp Red & Ivory Mini Dot Reverse patterned paper
May Arts Jute
Button
Cricut Doodlecharms Cartridge
EK Success Tag Punch

Directions:

Create card base and mat from patterned paper.
Stamp image on X-Press It Blending Card; Color with Copics.
Apply Stampendous Stardust embossing powder to flowers, polka dots and hair band; Heat set.
Cut one heart and one scalloped heart using Cricut and X-Press It Blending Card; Color with Copics.
Stamp sentiment on X-Press It Blending Card; Create tag using punch.
String button with jute.
Assemble card.


Let’s see what you can do with them! Stamp your favorite Stampendous Kiddos on any type of project and link it to the following linky tool for your chance to win a Kiddo of your own! (yes...you can use other cute kid stamps you already own, but Stampendous Kiddos on your project make it count twice!)(and yes, winners still need a U.S. Mailing address.

Thanks for visiting!


Saturday, December 15, 2012

A Stampendous WeeScapes Blog Hop


Stampendous is wrapping up another great collaboration today with the Wee Scapes Blog Hop. Please hop along and comment for a chance to win a great prize.


So my project isn't exactly a shadowbox, maybe a diorama? I don't know. What I do know is that I had a blast creating it. It's one of those projects that just has a life of its own, it created itself. See a stamp you know you must have? Please check out my supply list at the end of this post. I'ved listed and linked them all.

I started by creating the base and frame by scoring paper, securing it with Sookwang tape and then reinforcing it with chipboard that I had stamped with gold acrylic paint and then stained with spray mist. Next, I stamped all of the Stampendous images on Copic X-press It Blending Card, colored them with my Copics and cut them out, being careful to leave a flap at the bottom of the images that I wanted to 'stand.' I sponged ink and splattered some coffee to give everything an aged feel. I added Stampendous Aged Gold Embossing Enamel to the poster and the outside of my tent. Before adhering the Wee Scapes Yellow Flower Meadow and Grass papers to my circus scene, I cut slits in the paper in which I slid the image flaps through. I used Sookwang tape again to secure the images on the underside of the grassy papers.


Wee Scapes generously gave our team all sorts of wonderful, tiny things (you can see some of my other creations using these Simi Creative goodies here). One of the things I received were two sizes of tiny people. I colored them with my black Copic marker and added them to my scene using my hot glue gun. I also added some shrubs, a tree and the flowers in my clown's hand (he must have pulled them from his sleeve). Next, I added the fence and created my 'tent' using some tulle scraps. I also made a roll of tickets by stamping the ticket image several times in a line, coloring them and then splattering them with coffee. To finish my scene I sprinkled some Stampendous Color Fragments to give the grass more texture.


I know you want to see what my teammates have created. Please give them some love when checking out their very fabulous projects.

Stampendous Impressions
Annette Witherspoon
Jennifer Dove
Jennifer Ingle
Lea Kimmel
Suzanne Czosek
Wendy Price

Thanks for visiting!
Noteworthy Supplies:


Thursday, December 13, 2012

A Very Special Birthday

If you are looking for some Stampendous Wee Scapes inspiration, please scroll down or click here. Today is a very special day that called for a very special post.


Our Stampendous Design Team Coordinator is celebrating a birthday today so we decided to get together and throw her a little party hop.

Laura is a wonderful lady! She's super hard working, incredibly witty, insightful, creative and encouraging. Whenever I'm feeling discouraged and want to chuck it all, she knows what to say and pulls me up to continue on. It was Laura that believed in me when I first started to make cards. I've learned so much from her and will always be grateful.

Happy Birthday Laura! May your day be filled with joy and laughter.


My card was created using Stampendous Calligraphy Sampler, Leaf Sprig and Birthday Assortment as well as an assortment of my favorite Tsukineko Memento Ink.

Please join me by hopping along with fellow Stampendous Design Team members in wishing Laura a fantastic birthday. While you're hopping, please stop by the Stampendous facebook page and send Laura your personal wishes.

Kristine Reynolds

Wendy Price

Krissy Fossmeyer

Lea Kimmel

Tenia Nelson

Janelle Stollfus

Suzanne Czosek

Cyndi Bundy

Yana Smakula

Mary Dawn Quirindongo

Asia King

Melinda Gleissner


Thanks for visiting!

Noteworthy Supplies:


A Stampendous Collaboration with WeeScapes


Thank you for visiting my Stampendous Wee Scapes Collaboration post today. When you are done checking out my Wee Scapes creations, please click here. The Stampendous Design Team is celebrating our leader, Laura Weed's birthday with a fun celebration hop.

So all this week Stampendous is collaborating with Simi Creative Products, using their Wee Scapes Collection. I always thought the little trees and bushes were for model train enthusiasts but that's where Laura Weed's insight is so amazing. She challenged us to think outside the box and create with the wonderful assortment of product that Simi Creative Products so generously sent us.

Here are two completely different styles of projects that I created using this fun medium.


The first is this fun, pseudo-steampunk hat. I stamped the Stampendous Steampunk Owl on Wee Scapes asphalt paper which was so easy to work with. After assembling the hat, I swiped sections of it with VersaMark and melted Stampendous Aged Gold Embossing Enamel. Trust me when I say this paper also embosses really well. I was afraid the heat from my heat gun would melt its fuzziness. It didn't. My only regret is that I didn't emboss before assembling my hat because the heat did melt the glue from my hot glue gun which is why it looks puckered. I then added some tulle, a feather and a rolled up piece of dry wall patch. The wire band on the hat I modified from a piece I found in the jewelry aisle at Michaels. My finishing touch is the stamped and embossed gear. I used a gear from the Stampendous Guys and Gears set and again my favorite Aged Gold Embossing Enamel.


My second project uses this cute Stampendous Hula Kiddo stamp which I colored with my Copics. I added a whole bunch of Wee Scapes goodness to the image. The flowers on her lei are actually from a little bush that I cut up. There's some fuzzy grass at her feet but my favorite product is the long indivual strands of grass that I added to her grass skirt. I told you, so many possibilities! I also added some Stampendous Golden Sand Embossing Powder around her feet. Love it! The sentiment is from the Stampendous Birthday Assortment set. To create my card, I stamped the Stampendous Shell Background using VersaMark onto cardstock, wrapped it with twine and added a fringed grass skirt piece.


Two of my dear Stampendous teammates have also posted Wee Scapes projects. Please stop by and give them some love. Remember to comment on all of the Wee Scapes posts this week and stop back on Saturday for our wrap-up blog hop all for a chance to win a great prize.

Suzanne Czosek
Wendy Price

Thank you so much for visiting today!

Noteworthy Supplies:
Project 1


Project 2


Saturday, December 1, 2012

Stampendous DIY Bangles Blog Hop


Today's project is a wreath I made for the Stampendous DIY Bangles Blog Hop. It's been such a fabulously fun week playing with these terrific DIY Bangles products.

To create my wreath, I made several rosettes of varying sizes from a We R Memory Keepers paper pack. Before adhering the rosettes to the DIY Bangles 12" Floral and Craft Ring, I embossed some with Stampendous Shabby White Embossing Enamel. To others, I added Stampendous Champagne Crushed Glass Glitter.

I then stamped two of my favorite Stampendous Christmas images, Teddy Kiddo and Tree Trim Kiddos and colored them with my Copics.

After attaching my images, I finished my wreath by adding a few jingle bells and some tulle.


Please take some time to visit my fellow team members' blogs. Remember to leave comments for a chance to win a great prize.

Stampendous Impressions

Annette Witherspoon

April Derrick

Barb Turpin

Jennifer Ingle (Jingle)

Kristine Reynolds

Lea Kimmel

Mary Dawn Quirindongo

Melinda Gleissner

Tenia Nelson

Wendy Price


Thanks for visiting!

Noteworthy Supplies:


Thursday, November 29, 2012

Stampendous DIY Bangles Week


Stampendous has teamed up with DIY Bangles for a fantastic collaboration. It's been so much fun creating with their wooden bangles, beads and wreath forms.

I created two bangles using some of my favorite Stampendous products and the Pentagon Bangle.

I painted my first bangle with various colors of Twinkling H2Os watercolor paint. I saturated the paint with lots of water beforehand so that the color would go on thick. After the paint was dry, I added Stampendous Aged Gold and Aged Silver Embossing Enamels. These enamels are so easy to work with. I simply swiped the bangle with my VersaMark WaterMark ink pad, sprinkled the enamel over the wet ink and heat set with my heat tool. I sprayed a coat of Krylon Crystal Clear Glaze on the bangle to give it some shine.

My second bangle was painted with the Pearl Adirondack Paint Dabber and then Twinkling H2Os. When dry, I stamped the new Stampendous Leaf Sprig image onto the flat panels of the bangle using Tsukineko StazOn Jet Black and Delicata Golden Glitz ink. When the ink was dry, I added a little distressing by rubbing a black Gelato pigment stick around the edges.

Looking for more DIY Bangles inspiration? Please visit Mary Dawn Quirindongo's blog and Wendy Price's blog to check out their fabulous projects. Also, please stop back on Saturday for the Stampendous DIY Bangles Collaboration Blog Hop.

Thanks for visiting!

Noteworthy Supplies:


Saturday, November 10, 2012

A Stampendous Fast Finish Blog Hop


Today, Stampendous is wrapping up the week-long collaboration with Beacon Adhesives. There have been some amazing projects.

I created this card using the Stampendous Jumbo Cottage Rose image. I stamped it three times on Copic X-Press It Blending Card and colored it with my Copic markers. I then fussy-cut the three images, keeping one completely intact. I cut apart the other two images so I could stack and layer them for dimension. Before adhering the parts together, I brushed Beacon Fast Finish on them. I love the shine. The background panel was stamped with the Stampendous Cling Calligraphy Sampler stamp using Memento Toffee Crunch dye ink. I layered some die-cuts and added a panel that I stamped and embossed with Stampendous Detail Gold Embossing Powder. I love how the Stampendous Cling Jumbo Sets always have an added stamp, usually some sort of flourish. It's a great way to add dimension to your cards.


Please visit the following blogs and leave your thoughts on the projects. A lucky winner will receive Fast Finish Decoupage Medium and some Stampendous Stamps.You must have a US mailing address to win.

Kristine Reynolds

Mary Dawn Quirindongo

Melinda Gleissner

Stephanie Lee (Arty Carty)

Suzanne Czosek

Janelle Stollfus

Krissy Fossmeyer

Lea Kimmel

Wendy Price

Tenia Nelson

Wendy Jordan


Thanks for visiting today!

Noteworthy Supplies:


Thursday, November 8, 2012

Stampendous and Beacon Adhesives


All this week, Stampendous is joining forces with Beacon Adhesives. Beacon is the official liquid adhesive of the TV show, Craft Wars and has a liquid adhesive to meet all of your crafting needs. I love using Zip Dry when making cards. Recently my love affair has expanded to another Beacon product, Fast Finish Decoupage. It is a great sealant and decoupage medium. Here are a couple other projects I made using this fantastic product: coaster set and witch hat.

Today, I created some chipboard tags to be used during the holidays. I started with a *chipboard ornament mini album, making each page a separate tag. I stamped various Stampendous Christmas images on each ornament using Memento Tuxedo Black ink and then colored with
Prismacolor Premier colored pencils. I then brushed each ornament with Beacon Fast Finish to seal it. Each tag has several coats of the sealant, with drying time in between. As tags, I probably didn't need to seal them but to be honest, I was originally going to give these to my son as magnets that he could place on friends' lockers at school. I love the 'finished' look that sealing them created. The next step was to swipe the 'hanger' of each ornament with VersaMark and emboss using Stampendous Embossing Enamel. I used Aged Gold and Shabby Blue.


Here is some more inspiration from some of my Design Team friends. Please visit their blogs and leave them some love. We all really appreciate you taking the time to look and comment on our creations. Please note that this Saturday we will have a huge Stampendous/Beacon Blog Hop. I hope you'll join us.

Stampendous Impressions
April Derrick
Kristine reynolds
Rhea Weigand
Suzanne Czosek

Thank you so much for visiting today!

Noteworthy Supplies:


* I think the chipboard ornament album is a Clear Scraps product but I am sorry I do not know for sure.