Wednesday, July 11, 2012
Another Great Collaboration, EnviroTex Jewelry Resin and Stampendous
Stampendous has teamed up with Carmi Cimiata and the Resin Crafts Blog for another fun collaboration. All this week, we will be showcasing creations we've made using Enviro Tex Jewelry Resin and Stampendous products. The week will end with a huge blog hop on Saturday and of course, there are prizes!
Carmi has 3 prize packages for our fans in Canada where she lives. She’ll draw three Canadian winners from the comments on her blog.
Stampendous is also giving away 3 prize packages for our friends with US mailing addresses:
One winner will be drawn from the weekly comments on the Stampendous blog.
One winner from the comments on Saturday’s Big Blog Hop.
One winner from Facebook (You need to SHARE one or more of our posts about
this project on your Timeline to win).
Each prize package from Stampendous will include a pack of Jewelry Resin, a bottle cap, bezel and button to try, and the Stampendous Charm Collection Perfectly Clear Stamps – perfect jewelry sized stamps for your crafting pleasure!
I am forever losing my keys (and my husband's keys) so I created this tray for my mudroom. My theory is if I have someplace special to put our keys, I will no longer be frantic while running out the door in the morning.
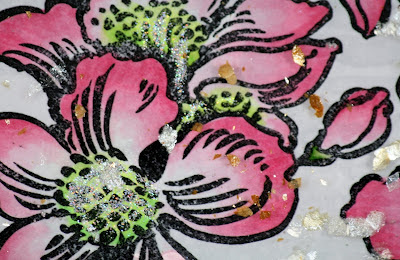
The tray itself, I found at Michaels. I stamped a panel to fit in the bottom using the Stampendous Cling Jumbo Dogwood Set and Memento Tuxedo Black Ink. After coloring the image with my Copic Markers, I sprinkled my favorite Stampendous glitter onto the centers of the flowers.
I glued my panel to the tray and added a thin layer of resin on top. I let this dry overnight. In the morning, I sprinkled Pearlized Mica Fragments and Gilded Mica Fragments over the panel. I then poured another layer of resin on top. Mica Fragments are amazing! They add shimmer and shine to any project and come in a variety of shades. You can purchase them in a couple of different ways: Individual bottles or in a kit for those who want to sample five different shades. If you scroll to the end of my post I will link both options for you. Trust me, once you try them, you will want the big bottles in every shade. I repeated the process one more time, sprinkling more fragments and then adding more resin.
Please visit the following blogs for more inspiration and then stop back again on Saturday for our Blog Hop finale. If you like, please stop back again tomorrow. I had so much fun combining these two great manufacturers' products that I made a few extra projects and would love it if you would check them out.
Thanks for visiting!
Noteworthy Supplies:
Subscribe to:
Post Comments (Atom)


Wow!!! Melinda, this is incredible!!! You didn't start off with a tiny project to get your feet wet. You went big and is it ever AMAZING!!! Beautiful job!
ReplyDeleteThis is beautiful. Love the idea of sandwiching the mica flakes in layers of resin. It really adds depth to the project
ReplyDeleteWhat a great project Melinda~!
ReplyDeleteThis is a terrific project!! I love the idea!
ReplyDeleteWOWZA!!! This is gorgeous!
ReplyDeleteWhat a fun project idea! The wheels are turning....I'm thinking I could do something like this with some of my daughter's art or a photo to make a little try for her. How much resin did you need for this?
ReplyDeleteHi Miriam,
DeleteChildren's artwork would be very cool set in resin. I'll admit it, Using Enviro Tex has been so fun and easy that I've been walking around the house looking for things to pour it on. It comes in a lot of different sizes. I bought the 32 fl. oz box (16 oz of resin and 16 oz of hardener). To make the tray, I measured 1/4 cup of each, mixed and poured. I did this a second time as well. There is still plenty left in my bottles. I hope this helps.
So so pretty!!!
ReplyDeleteHoly cow...this is amazing. Functional and beautiful...a perfect combination!
ReplyDeleteThis is beautiful!
ReplyDeleteWow...this is just gorgeous, Melinda! You sure did an amazing job with this fantastic project! Just adore it!
ReplyDeleteYou are amazing! This project is just da-bomb!
ReplyDeleteI've never crafted with "fragments" but LOVE the look they give to your project! Thanks for sharing!
ReplyDeleteI love that tray. What a fantastic project.
ReplyDeleteThis is really cute and I will be getting some of that Mica stuff.
ReplyDeleteOkay this is fabulous! Wait until you see my project on sunday.. Great minds think alike! LOL! Wonderful design and love that you layered the Mica flakes into the middle!
ReplyDeleteWhat an awesome project. I love the mica glitter and even with a flat screen, I can see the shine and glitter. TFS.
ReplyDeleteBeautiful project, thanks for the inspiration!
ReplyDeleteCarol B
ciaoitalia2007(at)gmail(dot)com
Love this--very pretty way to keep your keys!
ReplyDeleteThis is so beautiful! It would make a gorgeous gift for anyone! I would live to see your keys in it to get a better idea of the size, but at any size, it is just beautiful!
ReplyDeleteMelinda, this is just beautiful! I love it! It's very inspiring!
ReplyDeleteGreat idea for a tray! I'm loving this combination!
ReplyDeleteWhat an amazing idea! You created a fabulous tray. Love the layers and colors and sprinkles, oh my!
ReplyDeleteoh my goodness Melinda!! This is just gorgeous!!
ReplyDeleteThe tray is fantastic, and that card is adorable!
ReplyDelete