Saturday, July 14, 2012
I Can See Clearly Now...
...that I love Stampendous products combined with Enviro Tex Jewelry Resin! I also know that Carmi Cimiata from the Resin Crafts Blog is my new hero! If you haven't visited Carmi, please make some time this afternoon to check out her incredible art on the Resin Crafts Blog.
Thank you ETI for your generosity. I have loved every moment of this collaboration.
I have two projects to share with you today. The first is a serving tray that I created using old CDs. My husband subscribes to a lot of magazines from the U.K. The magazines frequently are packaged with CDs or DVDs. After my husband loads the media into his computer, he has no use for the discs. Being the craft hoarder that I am, I have saved them with the intention of making one of those cute CD scrapbooks that were popular five years ago. Yes, the book never got made so I took the CDs and cut them up to make this mosaic-lined tray. FYI: If you are going to try this, don't use your best paper scissors to cut CDs. It will ruin them. Alas, this pair was already trashed from cutting through packaging.
I cut several CDs into various sized pieces and then smeared them with VersaMark ink. This is when the fun began. Stampendous makes this incredible product called Embossing Enamel. It comes in several colors with lots more being released at CHA. Yay! So I dropped my inked pieces into my containers of embossing enamel, tapped off the excess and used my heat tool to melt it. I used Aged Gold, Aged Silver and Deep Impressions Clear. After the pieces had cooled, I stamped a few of them with various Stampendous stamps using StazOn Jet Black ink. Here are some closeups:
I attached the pieces to a tray (that I bought at Michaels and stained) using a glue gun, mixed up some resin and poured it on top. The Enviro Tex resin is self-leveling so it is really easy to work with, just mix and pour.
For my next project, I made some pendants and charms using two more really cool Stampendous products: Shaved Ice and Western Blue Jewel Glitter.
I mixed a batch of resin and stirred in Shaved Ice and the blue glitter, enough to make a paste. Then using the stir stick that comes with the resin kit, I carefully put my resin 'paste' in each of the bezels. Easy, huh? The hardest part was waiting for the pendants to dry.
Are you ready for more inspiration? As you visit each blog, make sure to leave a comment so that you'll be entered in the Stampendous drawing for a great prize package.
Thank you so much for visiting today. Have a great weekend!
Noteworthy Supplies:
Friday, July 13, 2012
Fun Folds Sweet 'n Sassy Digi Challenge
There's a new challenge over at the Sweet 'n Sassy Digi Challenge Blog and it's sure to be a fun one. This week's challenge theme is fun folds.
Please keep in mind as you play along to ONLY use digital images for the challenge. You don't have to use Sweet 'n Sassy digital images to play along but we sure love it when you do. Please share a link to your creation using the Linky feature at the end of today's Sweet 'n Sassy Digi Challenge post. If the link feature is down, please add a link with your comment. When uploading to online galleries, please use keyword SNSDC62.
For every card you link to the Challenge Blog throughout the month of July, you will receive one entry in the monthly drawing. One lucky winner will receive 3 digital images of his/her choice from the Sweet 'n Sassy Stamps Store. Please note, if you use Sweet 'n Sassy digital images to create your project, you will receive two entries! Be sure to play along every week... The more you play and/or use SNS digis, the more chances you have to win!
I made a simple, square gate-fold card that uses two different Sweet 'n Sassy Digital Stamps: The image is the Poppies Digital Stamp and inside I included a sentiment from the Many Thanks Digital Stamp set. The best thing about using digital images is that you can size them to suit your needs. I've colored these pretty poppies numerous times but never at this smaller scale. I must admit, I love them small like this. Just think of what you could do with this and all of the other Sweet 'n Sassy floral digital stamps turned into "inchies." The patterned paper is from a 6" x 6" Cosmo Cricket paper pack called "Tea for Two." I finished off the card by adding some rub-ons from a Heidi Grace Ornaments collection.
Thank you so much for visiting today! I hope that you will play along with us and create your very own fun fold card.
Thursday, July 12, 2012
A Citrus Hello
Hello! There are so many exciting things going on over at Stampendous, I actually have a couple of projects to share.
The first is a card I made for this month's Stampendous Saturday Challenge which is all about color. All you have to do is create a project that is citrus-inspired. Last week I created a grapefruit/orange inspired card so today I thought I'd work with a lime color scheme. It was really quiet in my house as my boys are away, so I turned on my favorite soap opera and had fun creating this card. I must have zoned out because when I was done I realized it was clearly more than just lime-inspired. I like to think of it as lime/blueberry inspired. Hopefully, Stampendous will forgive me for straying just a little.
To create my card, I started with a 5" x 5" card base and layered panels from the My Mind's Eye "Lime Twist" paper pack (see, I started out with good intentions). I stamped this adorable Stampendous Cling Cowlik Butterfly image twice onto Copic X-Press It Blending Card. After coloring both images with my Copics, I die-cut one of them and fussy-cut the other. I stamped my sentiment from the Stampendous Daisy Stem Trio set using Memento Tuxedo Black ink and then completed my card by adding a few embellishments, Offray ribbon and those darling flowers by Recollections.
To enter this month's challenge, simply create something citrus-colored. Really, seriously, use citrus and then upload it to the Stampendous blog before Thursday, August 2 at 11:59 PM EST. For all of the details and information on this month's cool prize, please visit the Stampendous blog.
I also would like to share something I created for this week's collaboration between Stampendous and the Resin Crafts Blog. All this week, Carmi Cimiata from the Resin Crafts Blog and the ladies from the Stampendous Design Teams have created some really cool projects using EnviroTex Jewelry Resin. I had so much fun creating my projects that I just kept on playing. I keep looking for things to stamp and pour resin onto. To create my pendant, I used a Lisa Pavelka Bezel and black cording that I found at Michaels. I started by dripping alcohol ink onto acetate and then covering the inked side with Red Liner Tape. I peeled the backing from the tape and sprinkled it with Stampendous Pearlized and Gilded Mica Fragments. I then flipped the acetate over and stamped the miniature Carte Postale image from the Stampendous Charm Collection set, using Tsukineko StazOn Jet Black ink. After gluing the piece into the bezel, I finished my pendant simply by pouring resin over the image. The hardest part...leaving it alone while the resin sets.
Thank you so much for visiting today! Please take a few minutes and visit my fellow Design Team members' blogs. You will be in awe and greatly inspired. Also, Resin Week will wrap-up on Saturday with a huge blog hop and yes, there will be prizes.
Noteworthy Supplies:
Cowlik Citrus Hello Card
Resin Pendant
Wednesday, July 11, 2012
Another Great Collaboration, EnviroTex Jewelry Resin and Stampendous
Stampendous has teamed up with Carmi Cimiata and the Resin Crafts Blog for another fun collaboration. All this week, we will be showcasing creations we've made using Enviro Tex Jewelry Resin and Stampendous products. The week will end with a huge blog hop on Saturday and of course, there are prizes!
Carmi has 3 prize packages for our fans in Canada where she lives. She’ll draw three Canadian winners from the comments on her blog.
Stampendous is also giving away 3 prize packages for our friends with US mailing addresses:
One winner will be drawn from the weekly comments on the Stampendous blog.
One winner from the comments on Saturday’s Big Blog Hop.
One winner from Facebook (You need to SHARE one or more of our posts about
this project on your Timeline to win).
Each prize package from Stampendous will include a pack of Jewelry Resin, a bottle cap, bezel and button to try, and the Stampendous Charm Collection Perfectly Clear Stamps – perfect jewelry sized stamps for your crafting pleasure!
I am forever losing my keys (and my husband's keys) so I created this tray for my mudroom. My theory is if I have someplace special to put our keys, I will no longer be frantic while running out the door in the morning.
The tray itself, I found at Michaels. I stamped a panel to fit in the bottom using the Stampendous Cling Jumbo Dogwood Set and Memento Tuxedo Black Ink. After coloring the image with my Copic Markers, I sprinkled my favorite Stampendous glitter onto the centers of the flowers.
I glued my panel to the tray and added a thin layer of resin on top. I let this dry overnight. In the morning, I sprinkled Pearlized Mica Fragments and Gilded Mica Fragments over the panel. I then poured another layer of resin on top. Mica Fragments are amazing! They add shimmer and shine to any project and come in a variety of shades. You can purchase them in a couple of different ways: Individual bottles or in a kit for those who want to sample five different shades. If you scroll to the end of my post I will link both options for you. Trust me, once you try them, you will want the big bottles in every shade. I repeated the process one more time, sprinkling more fragments and then adding more resin.
Please visit the following blogs for more inspiration and then stop back again on Saturday for our Blog Hop finale. If you like, please stop back again tomorrow. I had so much fun combining these two great manufacturers' products that I made a few extra projects and would love it if you would check them out.
Thanks for visiting!
Noteworthy Supplies:
Thursday, July 5, 2012
Sweet 'n Sassy Digi Challenge Beach and Sand
TGIF! Today's Sweet 'n Sassy Digi Challenge theme is Beach and Sand.
Please keep in mind as you play along to ONLY use digital images for the challenge. You don't have to use Sweet 'n Sassy digi images to play along but we sure love it when you do. Please share a link to your creation using the Linky feature at the end of today's Sweet 'n Sassy Digi Challenge post. If the link feature is down, please add a link with your comment. When uploading to online galleries, please use keyword SNSDC61.
For every card you link to the Challenge Blog throughout the month of July, you will receive one entry in the monthly drawing. One lucky winner will receive 3 digital images of his/her choice from the Sweet 'n Sassy Stamps store. Please note, if you use Sweet 'n Sassy digital images to create your project, you will receive two entries! Be sure to play along every week... The more you play and/or use SNS digis, the more chances you have to win!
My card uses the very cute Cocoa & Cookie's Sandcastle Digital Stamp. You could definitely call this a CAS card. I colored the image with Copic Markers using a pointillism or dotting technique. I then sprinkled the 'sand' with Stampendous Golden Sand Embossing Powder, melting the powder by heating it from the underside. To finish my card I added a rub-on from the Scenic Route "Day at the Beach" set.
Thanks for visiting today. Stay Cool!
Noteworthy Supplies:
Wednesday, July 4, 2012
Celebrate the 4th
I just wanted to stop by and wish all of you a safe and happy 4th of July. May it be a day of celebrations.
I also wanted to show you a few cards I created for this great holiday. They are both pretty basic CAS cards but if you need a card quickly I have an unexpected stamp that can be used. Check out the Stampendous Cling Jumbo Sparkle Joy Set:
Yes, it's a Christmas stamp set but it is so versatile. I was using it the other day on my Stampendous/Clear Scraps collaboration (you can still go and check out all of the incredible inspiration). While playing around, it dawned on me that the 'sparkle' works as a fun background for a boy's page. So the other day, when I came across the set and realized the 'sparkle' could be sparklers and fireworks, I was overjoyed. Another 'outside the box' use for a Christmas set. Don't you love it when you can get more for your money.
For my card, I simply stamped the 'sparkle' in VersaMark and sprinkled it with red, white and blue Stampendous Embossing Powder. Fran Seiford, the founder and genius behind Stampendous came up with a great technique called Painting with Powder (I've linked to a wonderful tutorial with video). I used this fun and easy technique here. The sentiment is from a...get this, a Stampendous Father's Day set called For Him that I altered by trimming off part of the sentiment. Don't worry, if you use a good pair of detail scissors you can always put your sentiments back together on an acrylic block. No one will ever know.
My second card is a variation of the first. The sentiment is the same and if you look closely you will see faint stripes. They were stamped using VersaMark and a line stamp from the same Father's Day set. Man, I'm feeling frugal! The stars were die-cut using the Sweet 'n Sassy Stamps Stars Dies and Redline tape. After running the tape through my Cuttlebug, I used red and blue Stampendous glitter to cover the stars. I simply peeled the back off my glittered stars to adhere them to my page. Easy.
Thanks for visiting today. Happy 4th Everyone!
Noteworthy Supplies:
Tuesday, July 3, 2012
A New Month, A New Stampendous! Challenge
I know a little secret...there will be a new Stampendous! Saturday Challenge starting this coming Saturday, July 7th. The theme is citrus colors. How cool is that? Think of the possibilities. All you have to do to play along is create a card, layout or other project that is citrus-colored inspired. Then just link your project to this month's challenge. Please stop by the Stampendous! blog on Saturday to learn all of the details.
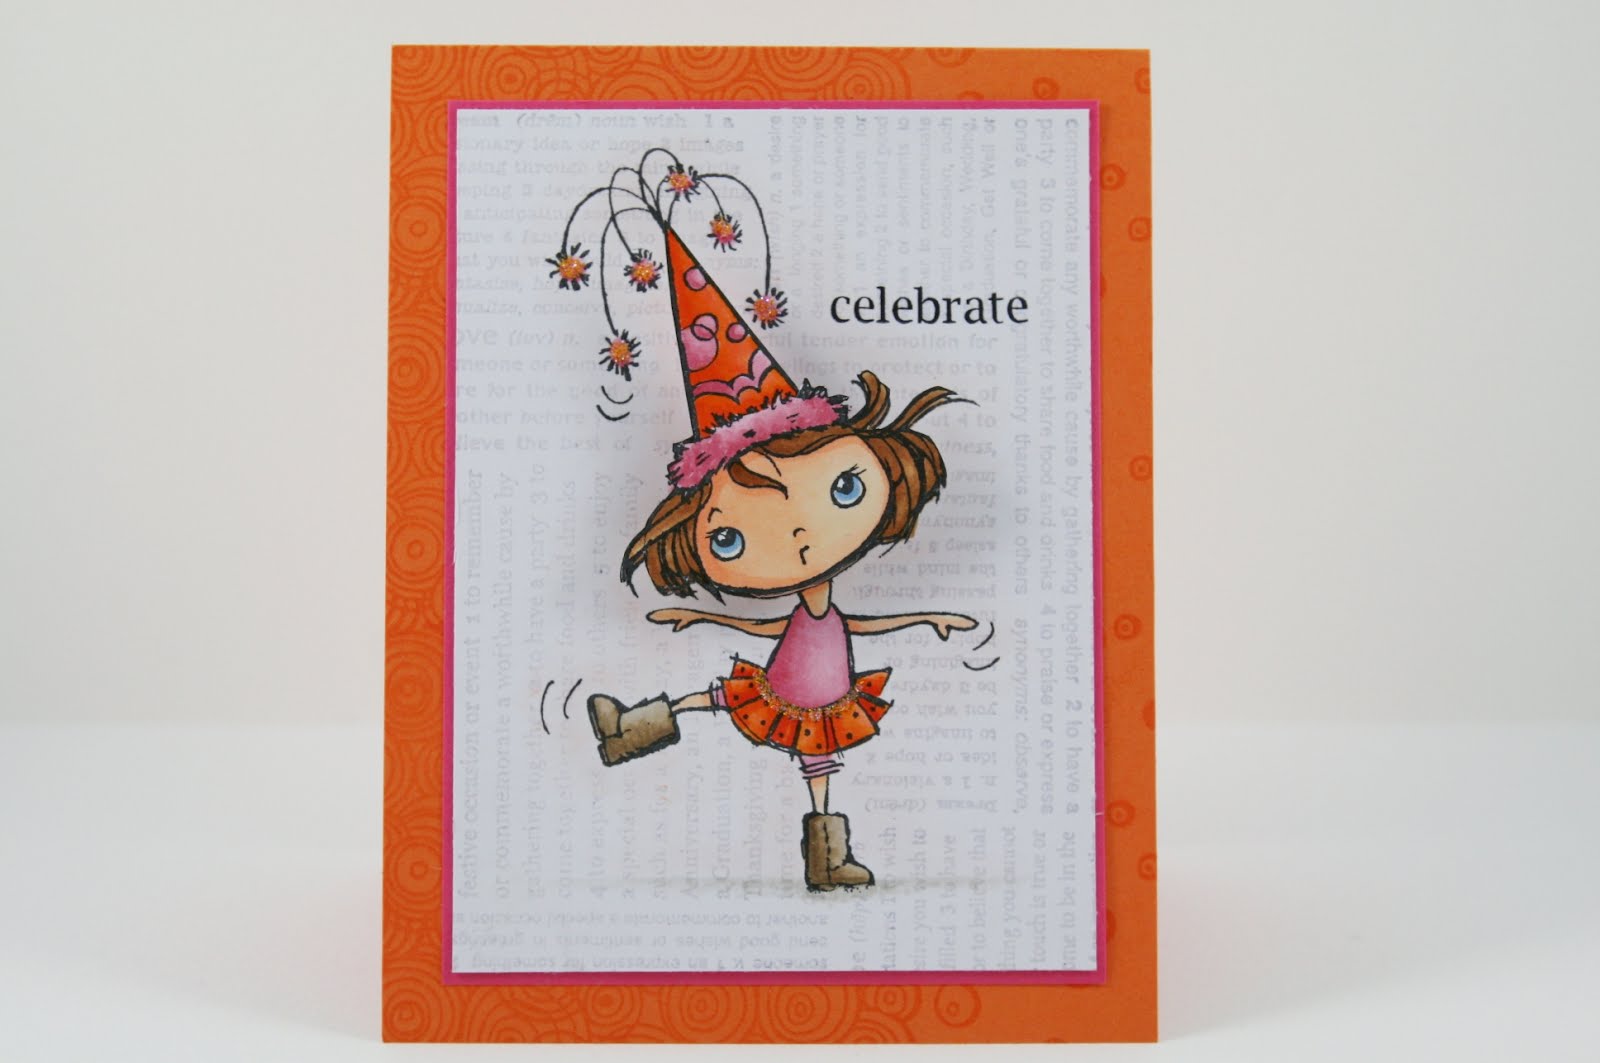
Oranges and pink grapefruit are some of my favorite fruits, orange and pink together is one of my favorite color combinations. I love this new Stampendous challenge.
After creating my card base, I stamped it with the Stampendous Cling Geo Bubbles using VersaMark ink. I then stamped the Stampendous Cling Party Hat Kiddo onto a 3-1/2" x 4-3/4" piece of Copic X-Press It Blending Card and again on a scrap piece of X-Press It. After coloring the image with Copic Markers, I fussy-cut just the head and hat from the 'scrap' image. I set this piece aside to be adhered later. I then created a mask by stamping the image again on a post-it note and cutting it out. I placed it over the colored image on my card panel and stamped the Stampendous Dream Text over top of it with VersaMark ink. I forgot to clean my stamp the last time I used it so the text has a gray hue to it. I stamped "Celebrate" from the Stampendous Birthday Assortment set and added glitter to the pom poms and around this kiddo's skirt. I used both pink and orange colors of Stampendous glitter (colors from the Pastel Pizzazz and the Over the Rainbow kits), mixed together. Adhering it was easy, using a Sakura Quickie Glue pen. To finish my card, I attached my spare 'head' to an Action Wobble and attached the wobble to my card. The wobble was just a little bigger than the image but that wasn't a problem. I just trimmed the wobble a little before I took the backing off the adhesive.
My birthday card also works perfectly for the Stamp It! Cards Birthday Challenge over at Moxie Fab World (ok, I planned it this way). I must admit this blog is my newest addiction. The colorful pictures are amazing and it's packed with inspiration. Each day brings something new and exciting. My family knows not to bother me when I find a new Moxie Fab World post in my mailbox. To play along with this challenge, simply create a birthday card in which stamping is the primary technique and then add it to the Mr. Linky tool on the Moxie Fab World blog.
Thanks for visiting today. Have a safe and Happy 4th of July!
Noteworthy Supplies:
Subscribe to:
Posts (Atom)